When we first built Telligent’s Community Server, one of the concepts that we used early on were some techniques (ok hacks) that enabled us to do some work on a background thread. Work such as: sending emails, indexing content for search, updating pre-calculated table data and more.
One small problem
Doing any kind of work on a background thread in ASP.NET is dangerous. One reason being that exceptions that occur on the background thread can’t be “caught” and can potentially take down the entire process. Yikes!
We knew this, but sometimes you make sacrifices for simplicity. This was on premises software so the less to support the better!
For our hosted edition we built on our jobs infrastructure that allowed us to run these jobs in a separate Windows process.
Surprise, surprise!
Fast forward a few years and now the DailyStory team is building on Azure. One of the great discoveries is Web Jobs. We’re not using the Azure APIs for web jobs, at least for now, as we wanted more control, but essentially what we’ve done is:
- Create web jobs for anything that doesn’t need to be part of the request logic: sending emails, updating tables, etc. Sound familiar?
- Create web jobs that are both tenant specific and data center specific. For example, the same sets of web jobs run in different data centers, e.g. US-1 and UK-1, but are intelligent enough to know that they only execute on tenants in those data centers.
- Use queues wherever we can. For example, if one of our customers uploads a CSV file with 5,000 contacts we’ll process the CSV immediately but convert each record into a queued write as a lead. We use web jobs to process the queues and can scale it out/up as necessary.
- Use async patterns through-out. From a scalability point of view, using the new async/await patterns is pure magic. Any out of process call is done using async/await, meaning we can be smarter about our thread management.
One of my favorite things about Azure web jobs is that they can be simple command line executables with a cron file to control when execution happens.
Using Cron with Azure Web Jobs
Probably the most confusing thing with using cron settings for Azure Web Jobs: there are 6 fields instead of 5. So if you’re used to working with cron you may be scratching your head. Here are the settings as it relates to Azure:
{second} {minute} {hour} {day} {month} {day of the week}
Next, you need to include a settings.job file. This is just a file that includes some JSON with your cron settings. For example, to have Azure run your web job once every 3 days:
[javascript]
{
“schedule”: “0 0 0 */3 * *”
}
[/javascript]
Important, make sure your settings.job file is copied into your bin\Release and bin\Debug folders by marking the file as ‘Copy to output directory’.
Deploying your Azure web job
Let’s briefly look at how to deploy a web job to Azure so that your cron settings are used.
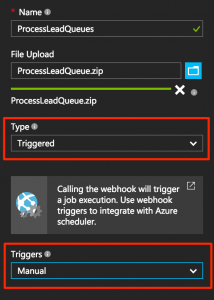
First, zip the files in your bin\Release. For example, I have a .zip for our ProcessLeadQueue job: ProcessLeadQueue.zip
Next, add the web job and set the type to Triggered and the Triggers to Manual:

This ensures that Azure will use your settings.job file for the cron values.
